Step 1-Specify Data Source
In this step, the data source type and location are specified. After selecting your data source, the desired database tables can be chosen and previewed.
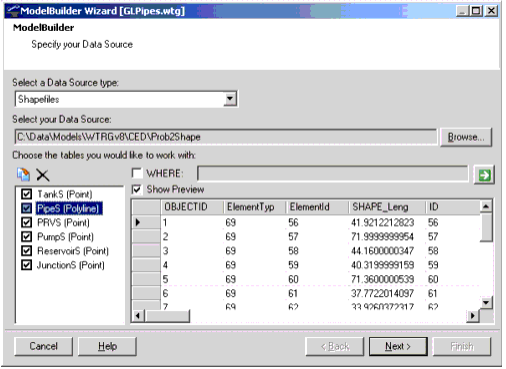
The following fields are available:
- Data Source type (drop-down list)—This field allows you to specify the type of data you would like to work with. If your specific data source type is not listed in the Data Source type field, try using the OLE DB data source type. OLE DB can be used to access many database systems (including ORACLE, and SQL Server, to name a few).
- Data Source (text field)—This read-only field displays the path to your data source.
- Browse (button)—This button opens a browse dialog box that allows you to interactively select your data source. Some Data Source types expect you to choose more than one item in the Browse dialog box. For more information, see "Multi-select Data Source Types"-190.
- Table/Feature Class (list)—This pane is located along the left side of the form and lists the tables/feature classes that are contained within the data source. Use the check boxes (along the left side of the list) to specify the tables you would like to include.
- The list can be resized using the split bar (located on the right side of the list). Right-click to Select All or Clear the current selection in the list.
- Duplicate Table (button)

—The duplicate table button is located along the top of the Table/Feature Class list. This button allows you to make copies of a table, which can each be mapped to a different element type in your model. Use this in conjunction with the WHERE clause. - Remove Table (button)

—The remove table button can be used to remove a table from the list. - WHERE Clause (field)—Allows you to create a SQL query to filter the tables. When the box is checked, only tables that meet the criteria specified by the WHERE clause will be displayed. Click the

button to validate the query and to refresh the preview table. - Preview Pane—A tabular preview of the highlighted table is displayed in this pane when the Show Preview check box is enabled.